Wacom is a company which produces high quality pen tablets and touchscreens. The tablets are a number one choice for Linux users since they are well supported. The Linux Wacom project provides an high quality driver and the userland tool xsetwacom to change the settings of the tablet such as button keys or pressure sensitivity.
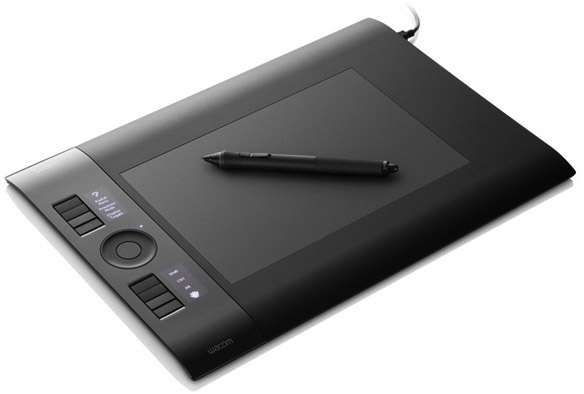
After reading some reviews, I decided to buy an Intuos4 M tablet for image manipulation with the GIMP. One of the reasons to choose this tablet was that it has eight buttons to which arbitrary key strokes are assignable. Each button has a little LED display besides it, which can be used to display the button assignment as a text or an icon.
After connecting the tablet to my computer (running Debian), I was able to configure the buttons with xsetwacom. However, there was no possibility to set the LED displays. The consultation of the xsetwacom documentation was fruitless. So I searched the developer’s mailing list and found a post which contained a piece of code to access the LED displays. Unfortunately, the code did not work for me, but it provided some useful information on accessing the tablet. The self-imposed challenge was to develop a little C++ application to set to LED displays.
The main features of the application are:
- The application uses libusb to communicate with the tablet.
- Images are converted to an appropriate format using the Magick library. This is, you can download a png/jpg image directly to the tablet, if the image has the appropriate size.
- The application contains an icon library. These icons can be used directly for configuration the tablet display. A bunch of common icons are included in order to use without generating appropriate images.
The remaining part of this post is a little howto covering the setup and usage of the application.
Building the application from source
- In order to compile the source code, the development packages of libusb and Magick++ libraries must be present on the system. Furthermore, g++ and make.are mandatory. Under Debian Squeeze, the respective packages can be installed with the following command:
sudo apt-get install g++ make libusb-1.0-0-dev libmagick++-dev
[- Download the source code, open a terminal window and extract the archive with the following command:.
tar xzf wacom-intuos4-led.tar.gz
- Change into the
Intuos4-LED/srcfolder:cd Intuos4-LED/src
- Invoke make to start the compilation:[cc lang=”text”]make[/cc] If the compilation is successful, then the folder contains two executables named
intuos4-led-checkandintuos4-led-config. The first one can be used to check whether the tablet works, The second one is the application to configure the tablet’s LED displays.Test whether the tablet works
Execute the following command and watch the LED displays of the tablet:
sudo ./intuos4-led-check
The LED displays should pass a little sequence of images and end up with a button labelling from “Button 1” to “Button 8”.
Setting the LEDs of the tablet
Note: The application cannot communicate with the tablet via the generic USB interface if the wacom driver module is loaded into the kernel. Hence, the module must be unloaded before setting the LEDs and reloaded afterwards. Concretely, the setup passes the following steps:
- Unload the wacom module:
sudo rmmod wacom
- Configure the LEDs with
intuos4-led-config - Reload the wacom module:
sudo modprobe wacom
- Configure the tablet with
xsetwacom
There are two ways to assign an image to an particular LED:
- Use a predefined image icon
- Use a png/jpg image with a size of 64 × 32 pixels
To determine the names of the predefined icons, execute
./intuos4-led-config --list
To assign the icon “Tux” to the display besides button 2, execute
sudo ./intuos4-led-config --icon Tux --button 2
Per default, the setup is done for a right-handed tablet orientation, i.e. with the buttons located on the left side. The perform a left-handed setup (buttons on the right side), the
--lefthandedswitch can be used.sudo ./intuos4-led-config --lefthanded--icon Tux --button 2
The image
icon-debian.pngis assigned to the display of button 3 with the following command:sudo ./intuos4-led-config --image icon-debian.png --button 3
The folder icons contains example images including the image
icon-debian.png.Generation of text icons
Using ImageMagick it is quite simple to create new text icons using the script
text-icon.sh:#! /bin/bash TEXTFONT=/usr/share/fonts/truetype/msttcorefonts/Arial.ttf convert -background black -fill white -size 64x32 -pointsize 14 -gravity center -font $TEXTFONT label:"$1" icon-$2.png
The script is located in the icons folder of the source distribution. In order to work, the MSTTCorefonts package must be installed. By calling
./text-icon.sh Copy copy
the icon
icon-copy.pngwith the text “Copy” is generated. The result is a png image of size 64×32 pixels:
Instead of Arial, you can use any (installed) truetype font by altering the
TEXTFONTvariable in the above script.A shell script for automated tablet configuration
The following script is an example for the automated setup of the tablet. Feel free to adapt for your needs.
#! /bin/bash # Device name of the tablet retrieved from xsetwacom DEVICE="Wacom Intuos4 6x9 pad" # Path to the tablet config application LEDCMD=./intuos4-led-config sudo modprobe -r wacom sudo $LEDCMD --button 1 --icon Undo sudo $LEDCMD --button 2 --icon Redo sudo $LEDCMD --button 3 --icon ZoomIn sudo $LEDCMD --button 4 --icon ZoomOut sudo $LEDCMD --button 5 --icon Save sudo $LEDCMD --button 6 --icon Alt sudo $LEDCMD --button 7 --icon Ctrl sudo $LEDCMD --button 8 --icon ArrowUp sudo modprobe wacom sleep 1 xsetwacom --set "$DEVICE" Button 2 "key ctrl y" xsetwacom --set "$DEVICE" Button 3 "key ctrl z" xsetwacom --set "$DEVICE" Button 8 "key plus" xsetwacom --set "$DEVICE" Button 9 "key minus" xsetwacom --set "$DEVICE" Button 10 "key ctrl s" xsetwacom --set "$DEVICE" Button 11 "key alt" xsetwacom --set "$DEVICE" Button 12 "key ctrl" xsetwacom --set "$DEVICE" Button 13 "key shift"
Note: The script was tested with
xsetwacomversion 0.11.0. If you use a different version, please check the xsetwacom man page for the correct syntax. - Download the source code, open a terminal window and extract the archive with the following command:.


Great work! Compiles and works flawlessly. Thank you.
How about extending this by adding a udev rule that automatically sets the icons and config (configured e.g. in /etc/defaults/wacom.conf or similar) when the tablet gets connected?
Thank you! The auto-configuration of the tablet is a good idea. Maybe, I provide an extension, if I have some free minutes left.
Thank you so much! I’ve been struggling with OLEDs in my Intuos4 M for some time (went through linuxwacom kernel patches, different driver versions etc.) and your solution is the _only_ one that works for me 🙂
Hi. Thanks for this, it is really useful and it works great for me (tried it on Ubuntu 10.4 and Mint 11). However, some changes have been made to xsetwacom more recently, and the sample script does not show it.
First, buttons are now called Button 1, Button 2, etc (with a space between Button and its number).
Second, for some Bamboo tablets and for Intuos4 tablets, buttons 4, 5, 6, 7 are not usable as are resereved by X. So instead of button 4, use directly button 8, for 5 use 9 and so on. I hit the problem myself and then fixed it as described above, based on the documentation I’ve found on the linux wacom project page.
Thanks again for your great work!
Hi Mihai. Thanks for the hint on the changes in xsetwacom. I changed the post appropriately.
Great work! But I wonder, can the LEDs beside the scroll wheel be switched on/off in any way? It would be cool to have them show a little light show. 😉
Christoph,
I have downloaded and am using your program in the manner you described, but it simply is not setting my LEDs to anything. I have tried running your test, and also manually setting both the built-in icons and an icon I made with ImageMagick (using the process you describe), to no avail.
I do not get any error message, and I have added debug statements to your code and can verify that it is calling libusb_control_transfer(), but simply nothing happens to my tablet. I also added a line to your code to enable debugging for libusb, but libusb is not returning any errors either.
I have plugged the tablet into a Windows machine and verified that the LEDs are working; do you have any suggestions as to what I should take a look at to figure out why the LEDs are not being set? I would appreciate any help you can offer at this point.
Also, if it matters, I am running Ubuntu 11.10 and I have “rmmod’d” wacom. My tablet is an Intuos4 wireless, and I changed the product IDs in your code to match the product ID for my tablet and verified that your programs are finding it.
Thank you!
Hi, Justin.
maybe, the protocol to transfer the images is different to the wired version of the tablet. I don’t have access to an Intuos 4 wireless tablet, so I cannot do some debugging on the USB port.
Sorry, Christoph
My intuos 4 wireless pluged via USB 🙂 pass the test 🙂
in WacomIntuos4LED.cpp I add a line
#define WAC_INTUOS4_WL_PRODUCT_ID 0x00bc
and in “if” on line 441 i added alternative
|| (product_id==WAC_INTUOS4_WL_PRODUCT_ID)
Hi, I’m using an Intuos4 size L on Kubuntu 12.04 but the tablet isn’t detected when I run your program.
Aha I got it working. I’m not a programmer, but it seems I just had to edit your source for my `product id`. I saw over on ubuntuforums they’ve used your code to make a more comprehensive tweaking utility. I’m going to look into trying that when I have some time.
Hopefully, one day it’ll be easy for us non-programmers to just add a ppa to get all this goodness with a nice GUI tool – the Gnome Wacom applet seems to be taking forever.
Hi Shaun,
thanks for the info. If you have more details on a GUI, please post it!
Christoph
Hi, Do you know if people are using this on other Intuos4 tablets? I’m trying to setup my girlfriend’s Wireless one (at the moment purely connected by USB). She’s running Ubuntu Studio 11.04. I’ve updated the device IDs in the source and recompiled. I no longer get a complaint about not finding the tablet, and the program runs for a few tens of seconds. However no images appear on the display. I’m not sure if the problem is a deeper incompatability with the slightly different tablet or something else is wrong with the setup. Do you know if anyone else has tried this on the Wireless model, please?
Hi, I had some requests concerning the Intuos 4 Wireless tablet. Nobody was successful in using the software with this tablet. Maybe, Wacom uses a different protocol to transfer the images. Since I do not own such a tablet, I am not able to do some investigations.
Christoph
Hi,
the L-size wacom-tablet needs the following changes in ‘WacomIntuos4LED.cpp’:
#define WAC_INTUOS4_M_PRODUCT_ID 0x00ba
The right device name for the scripts can be obtained by ‘xsetwacom –list’
Thanx for the code!
Hi Rolf,
thank you for the hint on the L-size tablet. I added the id to the code. It should work now out of the box.
Christoph
Hi Christoph,
nice work with led drivers! Does it works on rhel/centos/fedora systems too? I’m on centos 6.2 right now.
Thank you and best regards,
-Matteo
Hi Matteo,
I think it should work with Red Hat related distros too! I did not use anything special from Debian/Ubuntu.
Christoph
Works fine on Fedora 16 with an Intuos4.
Hi Christoph,
I’m having a problem with the OLED script using 12.04. I can successfully change the OLEDs and map the buttons once, but when I try to change them again (I made a few scripts for using different programs eg Gimp, Mypaint etc) the tablet freezes and I have to restart the PC to use it again. When I was using Oneiric I’m sure I was able to change the lights/button mapping as many times as I wanted?
Shaun.
Hi Shaun,
I cannot reproduce this problem. What happens if you unplug and plug in the tablet?
Christoph
Hi, I have a Intuos 4 but when I do the LED check with sudo ./intuos4-led-check I get this message.
Error: No Intuos 4 tablet found.
What is wrong for me? Can you help me please?
Hi Hamid,
maybe the USB Id of your tablet is not included in the source code. Use the command lsusb in a terminal window to determine the id of your tablet. Then use intuos4-led-check with the appropriate command line parameters to check your tablet.
Christoph
Hi Christoph, it turns out the problem was with Gnome’s Wacom plugin in Gnome Settings Daemon, if it is enabled you can only change the OLEDs once, and unplugging/plugging the tablet has no effect (tablet is frozen). Turning it off in dconf-editor solved it so everything works great now 🙂
http://ubuntuforums.org/showthread.php?t=1380744&page=31
I know this project is super old, but if anyone else attempts to use it. Here’s what I had to do.
I couldn’t get image loading to work without inserting this. I stuck it at the beginning of WacomIntuos4LED::imageToIcon. (Note, your path to magick libraries may be different.
InitializeMagick(“/usr/bin/”);
And My tablet stopped working unless I called this somewhere before intuos4-led-config exits. I put it into a function in WacomIntuos4LED and then called it right before exit(0) at the end of main.
libusb_release_interface(dev_handle, 0);
libusb_attach_kernel_driver (dev_handle, 0);
I’m really grateful for this code Christoph, I’ve just got myself a second hand large intuos4 and I can say (with Jess’s addition) it is working well – I also had to use install graphicsmagick-libmagick-dev-compat to get it to work (I’m using unbuntu 18.10 Cosmic).
I can’t get image to work atm just icon – I’m getting semphore error from imagemagick:
magick/semaphore.c:606: LockSemaphoreInfo: Assertion `semaphore_info != (SemaphoreInfo *) NULL’ failed.
I’d like to fix if possible – I wondered if this code might be on github so I can fork it – if not could I put it on with attribution linking here?